DVD Maker USB 2.0
Supplementary User Manual
for Use with ReplayerStudio
Please Note: This supplementary user manual provides basic, abridged instructions for using DVD Maker USB 2.0. This guide highlights only the features of DVD Maker USB 2.0 that are most relevant for use with ReplayerStudio. For complete instructions on installing and using DVD Maker USB 2.0, please refer to the pamphlet “DVD Maker USB 2.0 Capture Box: User Manual,” which ships with the product.
Installation & Operation
- Insert the CD-ROM disc labeled “DVD Maker USB 2.0” into your computer’s optical drive. Follow the instructions to install the capture and encoding software onto your computer. (You won’t need to insert the other CD that comes in the box.)
- Connect the DVD Maker USB 2.0 device to your computer as follows:
- Connect the USB cable to an available USB port (for best performance, make sure you have USB 2.0).
- Connect the Audio cable to the “Line In” plug of your sound card.
- Connect the DVD Maker USB 2.0 device to a video source, such as a VCR, set-top DVD player, or camcorder, using the composite RCA or S-video cables.
- Launch the DVD Maker USB 2.0 software application by double-clicking the following icon on your desktop:

- Doing this will bring up the main user interface window, titled PVR-PLUS:
- You are now ready to begin capturing or encoding video. The two icons in the uppermost left-hand corner of the PVR-PLUS interface window control these two important functions:
- The TV icon (boxed in red above) opens the video capture application.
- The icon just below it (boxed in green above) opens the MPEG encoder (for converting various kinds of video files to the MPEG format).
See below for more detailed instructions on actually using the video capture and encoding applications.
The Video Capture Application
After you press the TV icon in the main user window, the following control panel will appear. To begin capturing video, press the small icon boxed in red below :
You will then be prompted to enter settings for your captured video into the following Setup window:
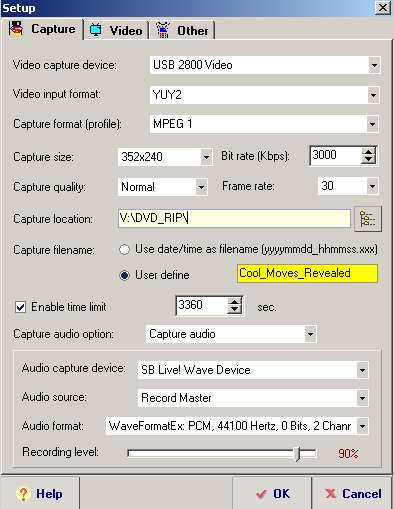
To capture video for ReplayerStudio, use the settings shown in the screenshot above. Specifically:
- Set “Capture format (profile):” to “MPEG 1”.
- Set “Capture size:” to “352x240” (for NTSC/American video).
- Set the “Bit rate (Kbps):” to the desired value. (Higher values mean higher quality video, but bigger file sizes. We suggest using a minimum bit rate of 1800; if you have a lot of free space on your hard drive, try 3000.)
- Set the “Capture location:” and “Capture filename” fields to whatever you want them to be.
- Enable and set a time limit so that capturing can stop automatically (we recommend going a few minutes beyond the duration of the video, just to make sure you capture it all).
- Set the Recording level to about “90%”.
When you’ve set all these fields, press the “Video” tab at the top. You will now be prompted to enter video-related settings into the following window:
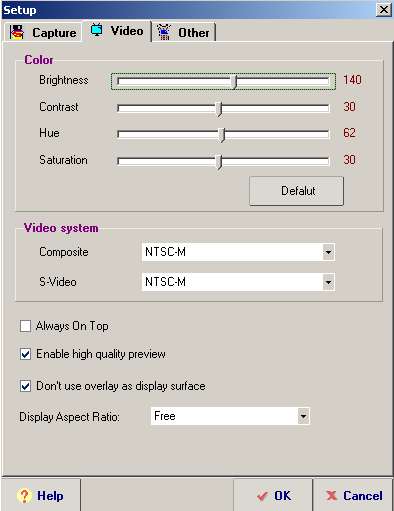
At first, you might try the “Defalut” settings (misspelled in the button), just to see how the video image looks. If it looks good, keep it as is. If not, adjust the Brightness, Contrast, Hue, or Saturation settings until the video image appears as you want it to. Then click “OK” to exit the Setup window. You will come back to the main capture control screen:
You are now ready to actually start capturing. The first time you capture from any source, you might want to try just capturing a minute or so of video. This way, you can check the created file to make sure you like the settings you chose. If you want to change something, you’ve only invested a minute or so of your time.
To begin capturing, press the record button (boxed in red above). Then, press the gray square (circled in blue above) to stop.
Once you’re done capturing, open your newly-created MPEG-1 file in ReplayerStudio. Make sure everything looks good. If not, go back and adjust the Capture and Video settings, as described above. Once you’re convinced it all looks good, re-start the capturing process, this time for your whole video.
The MPEG Encoder Application
The MPEG encoder that comes with DVD Maker USB 2.0 can convert just about any video file to MPEG-1 format, the ideal format for use with ReplayerStudio.
Setup
Below is a screenshot of the main command window for the encoder application:
To add files to convert, press the “+” button (circled in red above). After you select a file to convert, you will be able to adjust conversion settings in the following Option window:
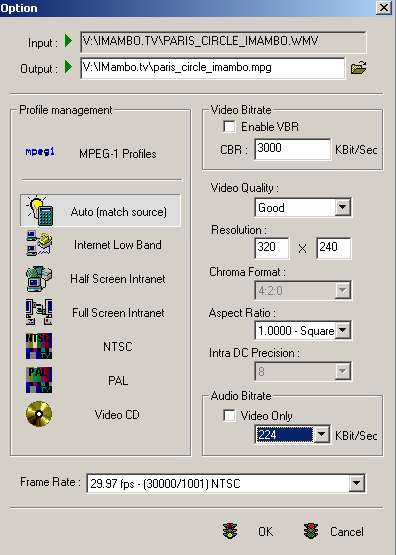
Before converting your files, keep in mind the following:
- Make sure that “Profile management” is set to “MPEG-1 Profiles.”
- Make sure that you’ve chosen an appropriate filename in the “Output” field.
- Make sure that the “Video Bitrate” CBR field is set to 3000 for very good quality, or to 1800 for average quality. (Remember that the quality of your MPEG-1 file cannot exceed the quality of the source file, no matter how high you set the bit rate. We suggest using the higher settings when converting MPEG-2 source files, and using the lower settings when converting most other formats.)
- Make sure that you’ve set an appropriate video resolution. (Unlike most other products, DVD Maker lets you set resolution as high as you want. However, increasing the size beyond that of the source file usually degrades video quality. As such, you should probably keep the same resolution as the original video, unless you want a smaller file size, in which case you can shrink the video resolution. However, if you shrink the video, make sure to maintain the same horizontal and vertical proportions, or your MPEG-1 video will appear warped. For example, if the original video resolution was “720x480” we suggest halving the dimension of the converted MPEG-1 video to “360x240”.)
- Make sure that you’ve set the “Audio Bitrate” to “224”.
Click “OK” to save your settings, and to get out of the Option window. You are now ready to actually convert your video files.
Single-File Conversion
- First, press the “>” button in the main command window (boxed in blue in the second screenshot above) to start the conversion process.
- While the conversion is in process, make sure that the Status cell reads “Waiting.” (boxed in red in the second screenshot above). When the conversion is finished, the Status cell will automatically change to read “Done.”
- To convert again, make sure to first double-click on the Status cell, so that it once again reads “Waiting.”
- Press the wrench icon (circled in blue in the screenshot above) to adjust the output settings, if necessary (unfortunately, every time you enter this window, the software forgets your settings, so you will have to adjust them again).
Batch Conversion
This application includes the very convenient feature of batch encoding. Thus, you can convert many files to MPEG-1 at the same time.
- First, press the “+” button, and then select several files to convert.
- Then, set the output settings for each MPEG-1 file.
- All of the files to be converted will then be displayed in the grid on the left:

- During conversion, make sure that all of the cells in the Status column display “Waiting.”
- But, if you want the application to skip a particular file in the conversion list, double click on the corresponding Status cell until it reads “Skip.”
- Finally, press the “>” button to begin converting all of your selected files. Of course, you can go away and come back later if the conversion process is going to take a while.